


This post included affiliate links, but I only share things that I LOVE & think you will too.
Hey everyone! Due to popular request, the first tutorial I will be sharing from June’s Rustic Room, is this adorable bear rug!
I made it for a total cost of *insert sticker shock* $6 thanks to a 50% off coupon from Hobby Lobby. The actual fur was the only thing I had to purchase, because I had everything else already on hand.
However, if you factor in all those costs, the overall price would be like $10 to make.The rug’s dimensions are 40×48″ To make your own Bear Rug, you will need: Thread and Needle 2 yards of Faux Fur Fabric (I got mine half off from Hobby Lobby for $6) Upholstery Button Kit (I used this one HERE) Black felt for the eyes and nose (you can get a single sheet for like 20 cents at craft stores) Knit Fabric for the muzzle and ears (I used an old sweater) Poly Fill for stuffing (you can use fluff from an old pillow too!)
The pattern can be found at the bottom of this post.
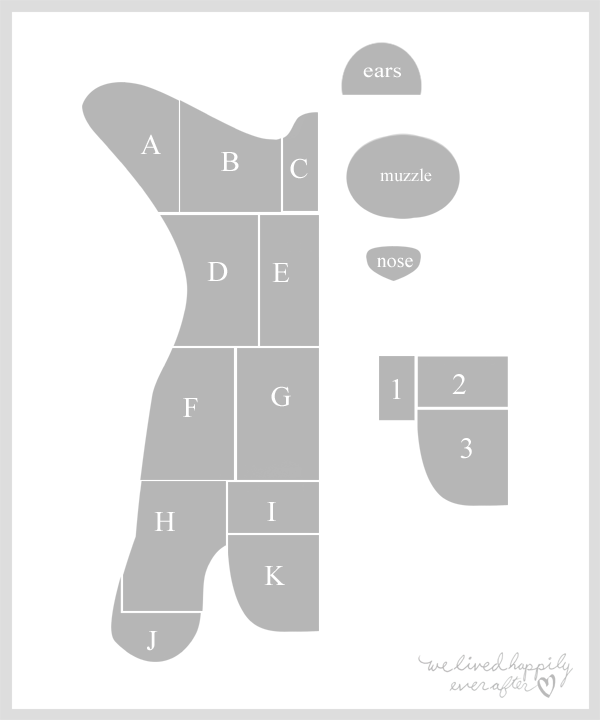
First, connect all the grouped pattern pieces as illustrated above. When you connect letters a-k you will have half the bear body. But don’t worry, we will fold the fabric over so that both sides will be identical when cut. Numbers 1-3 are for the pattern piece that goes underneath the head, making the face 3D. You will need to cut four Ear Pieces using the same pattern piece (two using the same fabric as the fur, and two using the fabric you want for the muzzle and inside of the ears) The Muzzle Piece should have two pieces of fabric cut from it, and should match whatever fabric you use for the insides of the ears. Lastly, the Nose should be made with Black Felt. Now for the full tutorial!
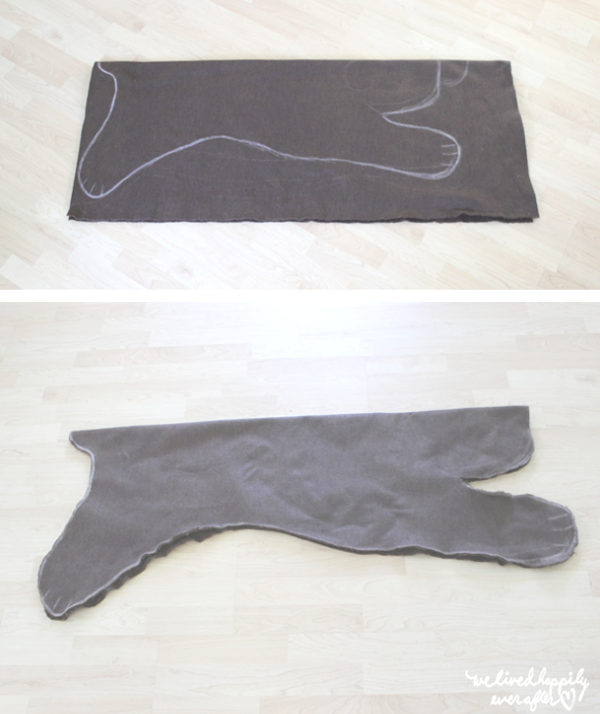
First, fold your fabric down the middle so that the head and tail will be doubled in width when unfolded. I traced my pattern out with chalk onto the bottom of the fabric, which made cutting much easier.

This is what it looks like after you have cut it out, and unfolded the two sides. Looking good already!

Now we are going to use the pattern piece with the numbers 1-3 for the head. Take those pattern pieces and use the same “fold over the middle” technique we used for the body. Lay this piece of fabric on top of the body piece, with the fur sides facing each other. They should match up with the existing head on the body. Sew the edges together, leaving the back part (the side facing closes to the tail) open. Turn it inside out and start filling with poly fill. When it’s looking good and full to you, go ahead and sew the back shut to the bottom of the rug.
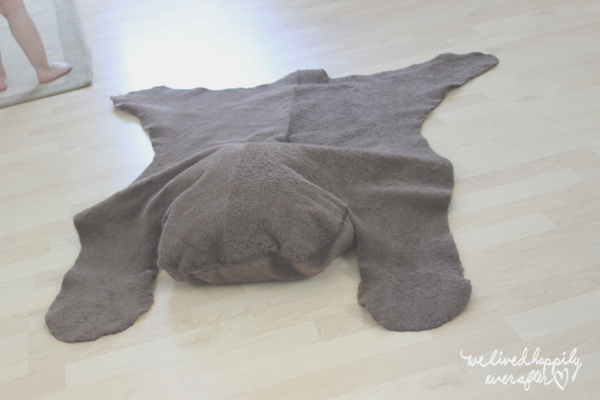
Now you have a nice little bump for the head.

To add the muzzle, cut out two pieces from the muzzle pattern piece and sew them together. Leave a small opening to fill it with more poly fill, then sew that opening together. Next, sew the muzzle to the front of the face. I found that it looked best when you tilted the head around the muzzle and attached it that way.

To avoid having a rug that looks like a platypus, we need some ears! Again, I used a knit sweater for the insides of the ears. Place the pieces together, with their front’s facing each other, and sew them together in a rainbow like shape. Fill these will poly fill as well.
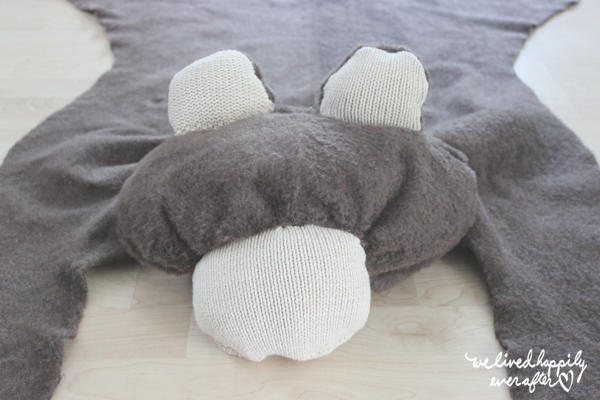
Here are both ears attached to the head. On a side note, I ended up pinching the edges of the bear’s neck, so the head wouldn’t bulge out from the shoulders. That’s up to your taste preference though.

Now sew on your felt nose and button eyes!

And your bear is all done!

You can add claws, a mouth, and the likes if you want. But I think this bear looks adorable as is.
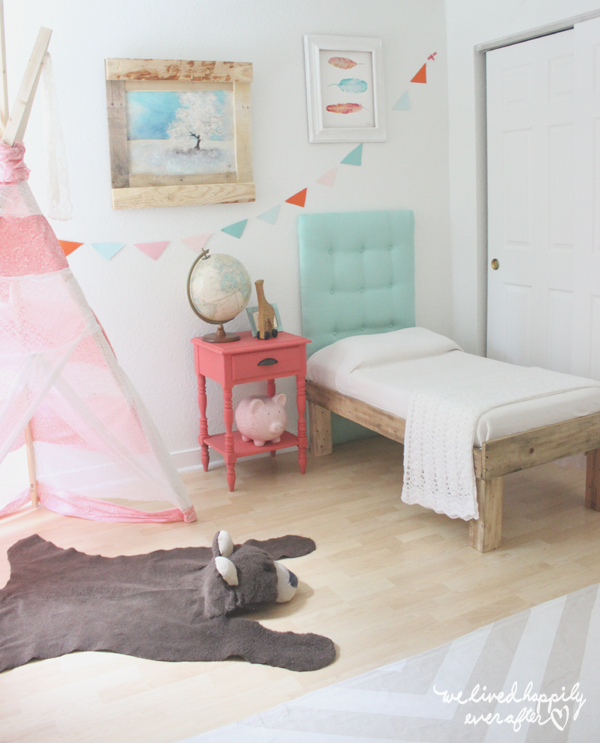
Personally, I am not a huge fan of real animal rugs… for my home decor at least. I do like sheepskins and such, but this rug is completely irresistible in a children’s room. It’s like a teddy bear brought to a whole new level of fun!

The great thing about it making one yourself, is that you can use any type of fur fabric to personalize the look for your little ones’s room. There were some awesome dark ones at Hobby Lobby, and they looked super real. However, I went with a softer looking fabric because all the colors in June’s room are bright and cheery. I actually almost made it a polar bear, but I am so glad I went with the brown. White would have gotten so beat up in her room, and a brown bear fits into the theme of “wild prairie” really well.

Have you checked out the rest of June’s Rustic New Room? You can find it HERE.
Which animal head tutorial do you want to see first? Tell me in the comments!
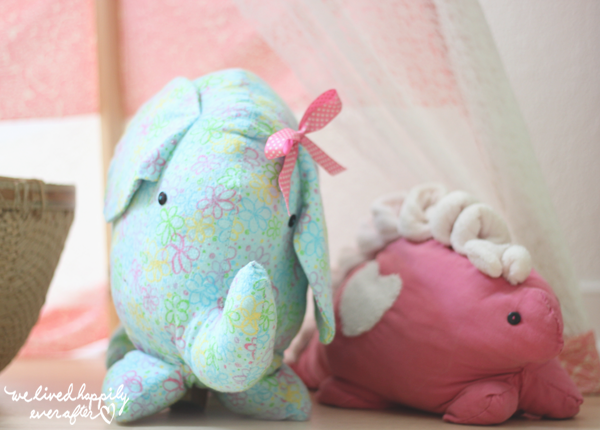
To see other stuffed animal tutorials that I’ve done, like this elephant and dino, check out my sewing section, HERE! I’m so happy to have a space for June to display them now.
That’s it for today. Hope you are all having a lovely week, and that this tutorial brings a smile to your face.
Do not redistribute or sell this pattern and/or items made from this pattern and tutorial. I reserve all rights to my patterns. This Download is totally free to all email newsletter subscribers of We Lived Happily Ever After. Not a member yet? See my steps below to join.

HOW TO DOWNLOAD:
All Printables are exclusive to my Newsletter Subscribers, and have a password protected link. Follow the steps below to access password for free downloads.
Follow me on Instagram @welivedhappilyeverafter for new freebies.


This. Is. Remarkable! June is such a lucky little girl!
Okay you need to do a tutorial for everything in her room! Tee pee, bed- all of it!! Such a good job!!
SO so so so so cute!!! Please stop by and share at our link party going on now. Just pinned this, too! http://www.delineateyourdwelling.com/2014/09/link-it-or-lump-it-party-number-55.html
Oh my goshness, this is ridiculously adorable! You are one clever mama.
I really thought you used the head from a teddy bear, amazing.
June has such a gorgeous room, you've done amazingly well with the decor
Dear Hannah,
I love the look of this room! And of course I would like to see all the animal head tutorials 🙂
Best wishes from Kiel, Germany,
Suse
omg so adorable!!!!! Christine from Little Brags
Sweeeet!!! Gotta make one for my grandson; he'll love it. Could you do the deer head soon? I'm trying to start my holiday crafting BEFORE the last second…;-)
Hi Kathy! I will try to have it up in the next week or so! 🙂
So happy that you will be using my patterns. I hope your grandson will love the bear rug! XO
bonjour !
je découvre ton blog grâce a ma fille So sooo Cute et j'adore
j'avais dans l'idée de faire a mes petits enfants un tapis ours , c'est rigolo du coup
en tout cas, bravo, il est très réussi
granny fée
So glad you like it! Have fun making one for your grandchildren! XO
Jaw dropping adorable. I am so putting this on my make list for the playroom!
Thanks Shelly! 🙂
Oh my word! Seriously adorable! Pinning and would love for you to share this at your link party tomorrow morning! http://www.biggerthanthethreeofus.com
Thanks Ashley! 🙂
I want to see the buffalo tutorial! 🙂
I'm hoping to put it up in the next week or so. XO
This is soooo cute!
Thanks! XO
Thanks so much for this tutorial! I just finished making one for my babys woodland creature themed nursery. One little comment though – I bought 2 yards of faux fur and I ended up only using 1 1/2 yards max, so now I have all this extra fabric. Mine wasn't as cheap as yours (~$10/yd at joann, on sale) so that kind of sucked to have leftovers. Did I maybe print out the pattern wrong? Maybe I'll have to make a matching baby bear rug. 🙂
Send me pictures ( welivedhappilyeveraftertheblog at gmail dot com) I want to see! 🙂
How long/wide did yours end up being? I know I had some left over as well, but I don't think that there was that much left over.
Thanks! XO
Hello, I made the rug over the weekend. I had to use brown cord fabric as I didn't have any felt, and his nose is a bit wonky but I'm really happy with the result 🙂
I've posted a pic on my Pinterest if you want to see it.
http://www.pinterest.com/janedj35/crafts-to-do-%2B-things-ive-made/
Thanks for the tutorial, I really enjoyed making it x
LOVE it! Thanks for sharing!!! 🙂
Your bear rug is adorable I'm making my 2 grandsons this bear rug Do you have anything for girls. Im also going to make the rugs Thank You so much for sharing your patterns I hope we stay intouch with each other
Thanks! As far as stuffed animals for girls- I have lots of tutorials for various animals in my sewing section. But I actually made the bear rug for my little girl, so I don't think it's gender specific. 🙂
Thanks for your sweet comment!
Did you use faux fur or was it more like a fleece material? I just looked at hobby lobby and the only faux fur I could find was $17.99/yard and not very wide. I just want to make sure I am buying the right thing. How wide does the material need to be?
I used faux fur with a coupon for 40% off (look online for the coupon)
At it's widest, the fabric is 40"
Hope that helps! 🙂
I made the bear rug for my granddaughter's first Christmas
and think it turned out wonderful!
i can't get your free download to open or anything. any advice?
Make sure you are on a desktop. Also, some browsers have issues sometimes opening my links. I use Chrome, if that helps. 🙂
I pinned this rug well over a year ago (love your style and just about everything you do 🙂 ) and I finally finished it up last night!!! I am NOT a sewer. I mean I was recalling 7th grade home ec, but I am thrilled with how it turned out! Thanks for the inspiration and tutorial! It's going to be a birthday gift for my son's second birthday next month.
hello im really anxious to make this! just wondering if you used a regular sewing machine or if you hand stitched? thanks
I hand stitched. 🙂
I'm having trouble opening the download link. It just keeps reopening the same tutorial window.
Use this link: https://files.acrobat.com/a/preview/ce8d6924-63f9-4ee4-954a-aa0d3eb09142
Thank you so much for sharing your ideas and patterns! Love your work!!!!
Thank you for your pattern. I finished my bear rug last night and I am so pleased with how it turned out. I used faux fur and I lined the bear with a dark fleece. I’ve made it for my friend who just became a grandmother. Uploaded a photo here (https://www.pinterest.com/pin/371969250464552529/)
Aww! It turned out adorable! Thanks for sharing. XO
Hello making you bear now for my twin granddaughters the part iam having trouble with is the pattern for the head numbered 1 2 3 when cut it is straight across on bottom looling at your picture yours is rounded the part that is closest to the tail and the sides are not as squared as mine are from cutting the pattern out like it is showed in tutorial please let me know what i have done differently tgen you it would be greatly appreciated thank you Michele
I had the same question, the underside of the head is very square. How did you sew it together? Do you have a photo of the underside? I’m trying to finish by the weekend for my daughters baby shower. Thanks in advance.
Did you make a video tutorial for this as well? I’m new to sewing and dying to make this for my son’s nursery but i’m so afraid of messing it up! I think a video would help me.
I am working on this bear now with my own spin on it. It’s for my brand new granddaughter, Briar Lynn. Born 3-6-20 weighing 7.7lbs. Her mother saw the ones on Etsy, I did as well shopping for her shower. Needless to say she made her grand entrance and I hadn’t even started on her rug. I cut out 2 of the 123 head pieces as well as lined the bottom with super soft fleece. The 2nd head piece I’m hoping the rug will fold into for travel. Which I don’t think there is any problem with. I am to the head stuffing sewing closed and having a how do I make this work moment. Any suggestions will gladly be considered.
I am working on this bear now with my own spin on it. It’s for my brand new granddaughter, Briar Lynn. Born 3-6-20 weighing 7.7lbs. Her mother saw the ones on Etsy, I did as well shopping for her shower. Needless to say she made her grand entrance and I hadn’t even started on her rug. I cut out 2 of the 123 head pieces as well as lined the bottom with super soft fleece. The 2nd head piece I’m hoping the rug will fold into for travel. Which I don’t think there is any problem with. I am to the head stuffing sewing closed and having a how do I make this work moment. Any suggestions will gladly be considered. Hope this works as edit. I’d really like to thank you for the pattern and tutorial. You seem to be the only person sharing this project. 👍👍👍👍👍✌️
I signed up for your emails and made the bear rug. Tweaked a couple things but it turned out so cute for my soon to be born grandsons nursery. Thank you for sharing.
I am working on making this bear rug and all is well except I don’t know where to connect pieces
1 & 2 to the head of piece 3.
I am not new to doing crafts so don’t know why this is so difficult for me to figure out.
Thank you.