


In case you’ve ever wondered how to build one yourself, it’s DIY Unicorn Time!
This tutorial has been a long time in coming. For the past year, I had been planning on making June a unicorn. But I had been dragging my feet, because I knew from my last stuffed animal taxidermy (see HERE) that this project was going to be very involved & complicated. June kept on begging me for a “Real Unicorn” for Christmas, so “Santa” came to our house every night after the kids went to sleep & worked on her magical pet.
It was worth all the blood, sweat & tears – but – I don’t think I’ll be making another one any time soon. While I didn’t document all the steps (due to MUCH trial and error & midnight sewing) I did take a couple pictures of the process & thought a post about how to build a unicorn might come in handy for other parents in my “where in the world do I get a unicorn” situation…
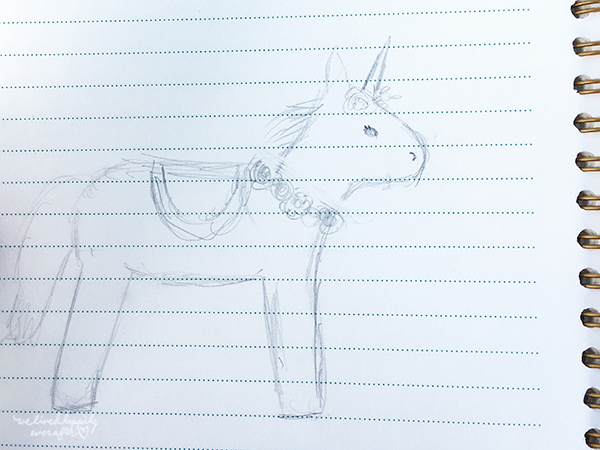
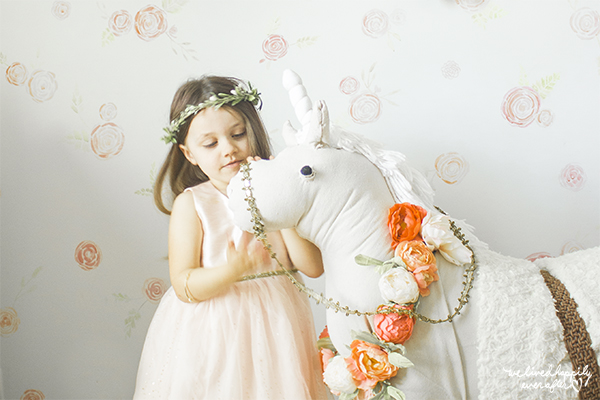
Disclaimer: Excuse the midnight photos. So first I drew up what I had in my mind. The unicorn that I made ended up being much larger than I anticipated. But that’s okay, becuase June and Jason can both fit comfortably on her back. I am not going to lie- it holds the weight of an adult too.
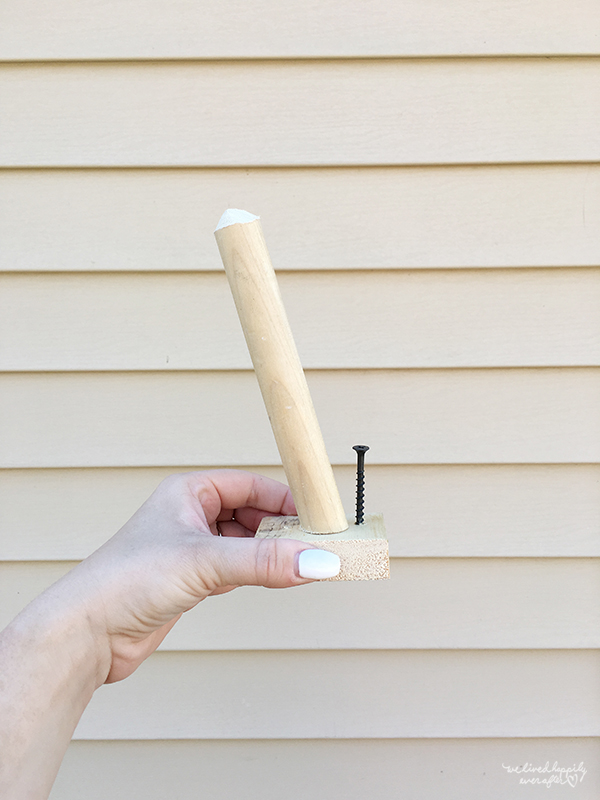
The first difficult thing I had to think about was how to do a horn. I had a thick dowel in the garage that I thought would work. I screwed it onto a small block of wood & then drilled another hole next to it so I could attach it to the framed head of the unicorn.

Here’s a beneath view of the horn screwed into the wood.

Next I built a frame using a very sturdy laminated shelve piece for the back, some 3×2’s for the legs (the back ones are tilted at a slight angle) and a slanted 2×6 for the neck.

June happened to see me building this part, and she excitedly put two and two together and started screaming “A Unicorn! A Unicorn!”I then did what any loving parent would do… I lied to her and told her it wasn’t a unicorn… and informed her that it was in fact a table. Then I asked her to sit on it, so I could see if it was a sturdy table. Can you tell how disappointed she was? LOL!

I knew I couldn’t risk her seeing it anymore, or the surprise would be discovered. So from that point on I only worked on it during bedtime. I used an electronic stapler (like $30 from Ace- SO worth it for this project) to upholster the legs. I just used strips I cut out from a drop cloth, leaving space to add stuffing. In the end, I ended up going back and redoing the legs, because they didn’t look natural to me with the straight edges. Legs need curves. In the end, I used fabric glue and created “triangle-looking” panels of my fabric together, turned them inside out (so the seams would be hidden) and filled them with stuffing over the existing upholstered legs.

Next, I added the back and belly. It was turning out to be a very “plump” unicorn.

Then I created a head and neck. I was too lazy to sew everything. So for a project this massive, I used fabric glue for all the seams. It worked perfectly, and has held up very strongly.

I tucked all the edges & seams into neat folds, and added mop hair & a mop tail.

Lastly, I added the face & horn elements, and hid any visible seams with a saddle & a garland of paper flowers.

June was thrilled to see that Santa had fulfilled her dreams.

And then she had the bright idea that she was going to ask for a Pegasus next year. #facedesk

Both the kids are in love with having a unicorn, and it has turned into a bedtime routine to tell June a story about her adventures with her unicorn.

I really hope all my hard work gives her magical memories of being little. She is such a creative little thing, and I just want her to always use her imagination & dream big.

So now you know how to build a pony sized unicorn. I really should be sharing more pictures from her room soon, as I have made some updates to the space. Until then, thanks for stopping by!


Thank you so much for this! I’m so making one for my niece! Amazing😍
Yay! Send me a picture when you are done! 🙂
This is amazing!
Can you provide more detail on how you did the head, and a list of the materials you used (or similar?) I know its been a while!
I’ve never created anything like this before but I have 3 weeks to have it ready for my daughters 4th bday! Thank you for this awesome idea.