


It’s time for my next Blogging Station Project! (See the whole reveal HERE)
I’ve come across several great clock tutorials during the past few years. And I am obsessed. I actually made this clock a two years ago, but I just didn’t have any pretty place to stage it.
I did a tutorial for this clock a while ago, but now that I finally have a place for it, (I’ve literally dreamed of this day everyone!) I have a gorgeous completed project photo. With that said, please excuse that most of the steps are copied from the old tutorial… the old “night goggle vision” grade photos used for this tutorial will make up for it, right? Hope that’s okay with ya’ll. Oh yeah, and don’t mind my old eyesore of a watermark.
The most important thing is that it turned out gorgeous, right?
For this project, you will need:
A circular board (if you’re lucky to have one) OR some plywood (mine was about 3×3′)
Two paint sticks
Screws & Nails
Jig Saw (they are only around 20 bucks!)
Paint
Paper (to use for stencils)
Tape
Sharpie
My first challenge was to create a perfect circle. I didn’t want to just eyeball it. Since my board wasn’t a perfect square, I measured the shortest side and subtracted an inch to give me room to cut it. I marked where the center would be base off of those calculations and drilled a hole for my nail.

Since my board was only big enough to make a 36″ clock, I taped my paint sticks together to measure 18″ (half of however tall you want your circle to measure) I then drilled holes on both ends of my paint sticks. Next, I inserted my nail into one of those holes and into the pre-drilled hole in the center of my board.

You want to be able to turn it in a perfect 360 circle.

The hole at the other end of the paint stick allows us to insert our pencil tip in and create the perfect circle! WOW! Pretty cool, right?

It’s easier than it may sound! And this photo goes to show that I made several adjustments in the size of my circle.
Me: “I’ll make a clock the circumference of one paint stick”
…
Me Again: “Never mind, I’ll make one the circumference of TWO paint sticks!”

Then my wonderful husband used the jig saw to cut it out for me. One tip is to go slow with this!

Here it is all cut out!

These are the letters I used. I printed them out, then cut them out perfectly.

I wanted to make sure I aligned all my numbers in order and that they were correctly spaced (and I didn’t want to accidentally draw one upside down!) so I sketched out a quick sample for reference, drew a light cross down the middle of the sketch and the clock and stuck the note in the center.

This is the method I came up with for letter transfers onto signs. It’s a reverse Stencil. It is SO much easier than anything else I have come across. All you do is tape the very top of your pre-cut letters where you want them, and then trace on top of the edges of your letter! As long as your cut out stencil was perfect, you will get a perfect, accurate outline. It’s so easy, I don’t know why I didn’t think of it sooner!

Don’t you love my little curious helper’s hands? I just had to use this one because of how cute it is!
Using the same paint stick circle technique, I created a circular center under my roman numerals. The only difference was the length of the paint sticks. I only used one paint stick this time.

To get two perfect circles you can make the stick have a shorter radius by making another hole for the nail or screw in the center.

Using the side of the sharpie, I antiqued the edges of the outside too.
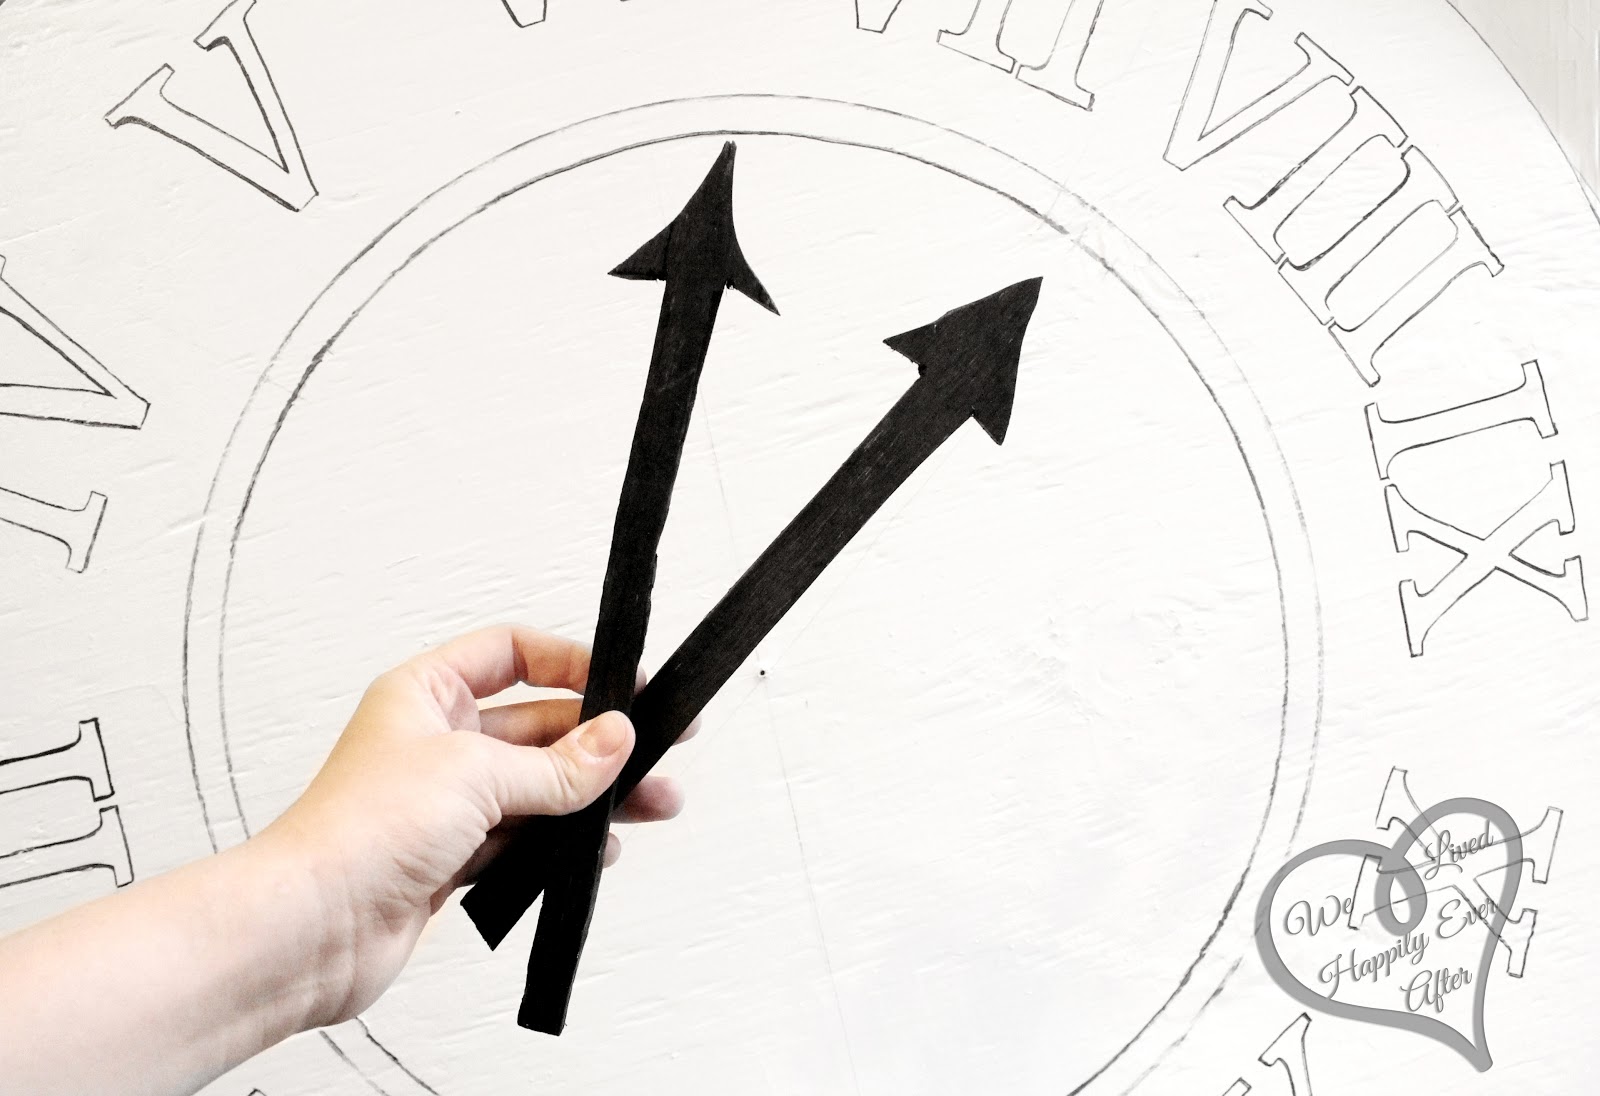
I cut some arrows out using the jig saw, and then colored them black with my sharpie (I love those things!)
Lightly drill a hole into both of them, stack them with their holes aligned. You know, that hole we’ve been using for all those circle steps? Yeah that one… Screw them into that hole.

I ended up going over the clock with a light coat of paint when we moved here, as I didn’t like the glossy one I used before (I like my paint eggshell flat!) The numerals ended up being more on the gray side, and I am LOVING how it turned out even more than before!
The hands don’t move like a regular clock, obviously, I just wanted it for decoration. But you can always put it on a special date or time in your life. Just an idea.

So that’s it. Don’t you just love it? And because I have all the supplies on hand, it didn’t cost me ANYTHING. Oh yeah!
Tip on keeping the cost down: If you are as frugal as I am, and don’t want to spend any money on your projects, just keep your eyes out for free scrap wood. If you don’t want to buy a jig saw, you can always buy a circular board from Home Depot, or you can buy a square plywood board, and just “draw” a circle on it. I’ve seen some lovely square clocks.
Be on the lookout for the rest of my blogging work space area reveal (found HERE) coming SOON!
Thank you all for stopping by! Don’t mind me, I’m going to go stare at my lovely clock and sigh.


I can not tell how sweet you and your creations are.. And you inspire me so much that I spent my whole night painting crepe paper petals to make your ranunculus flowers.. <3 Thank you so much and I am so happy for your station and your lovely clock! May the best be with you.. <3
Aww! Thank you SO much for your sweet comment! You really made my day! Hope your flowers turn out great! XOXO Hannah