


I am making my friend’s wedding cake.
(The wedding is this Saturday!!! AHHH! So excited for them!)
My mom, sisters and I were asked to do the cake. This will be our third wedding cake.
Here’s a picture of the last wedding cake we did.

This is the rough concept drawing for this cake. The bride wants a smaller cake: 10″, 8″ and 6″ layers.

We will be covering a yellow cake with dark chocolate frosting and then covering it with white fondant &
daisies. But that’s part two… I’ll post about it next week.
daisies. But that’s part two… I’ll post about it next week.
My wedding cake making method and technique is far from perfect. But I want to share with you the basics.
For part 1, you will find the following tools really helpful.

The first item is a cake lifter. The second, is a couple of cake spatulas for frosting. Next, a cake layer cutter. Also, cardboard cake bottoms (if you don’t want to buy them, I show how I made them below) And last, a piping bag (you can use a plastic ziplock bag too though.)

Cake cardboard bottoms are typically bought in bulk. Soooooo, since I only needed three, in three different sizes. I traced out the pans (top down) onto the foam board then cut them out.

Or you could just buy them. 🙂

Okay. Here we go.
After some research, I used this recipe for the cake batter. I tripled it.

Pick out what flavor you want. We wanted yellow cake.

Mix together your cake boxes, your flour, your sugar & salt.

Measure out your sour cream, your liquid of choice (I used water), your
flavoring of choice (I used melted butter), and your eggs. Add to your
dry mixture.
flavoring of choice (I used melted butter), and your eggs. Add to your
dry mixture.

Butter and flour your pans really well. All over the place (do the top rim too!)

Add your batter to the pans. I probably filled my pans a little over half way. Also, one note: some of my pans were too shallow to just do one cake pan for both layers for each individual cake… so I had to do two batches of batter in my pans to make two layers for each individual cake.

Bake your cake at 300 degrees for about 20-30 minutes (depending on
size of cake) then turn oven up to 325 for about an equal time. If cake
has pulled away from sides it is overbaked. They are done if a toothpick comes out clean from the center.
size of cake) then turn oven up to 325 for about an equal time. If cake
has pulled away from sides it is overbaked. They are done if a toothpick comes out clean from the center.

For your larger cakes (10″ on up) You will have to bake it longer… and your center may have a hard time cooking full through.
One method to help it cook fully in the middle is to stick a flower nail (the things you make frosting flowers on) with the nail head up in the center of your cake (don’t cook it “in” your cake though. Take it out after you are done baking! 🙂
Mine wasn’t a “big enough” to need the above method. Instead, I scooped off the middle of the unset top, mid way done, to allow the center to cook through.
Let your cakes cool off, then pop them out by turning them upside down. They should be pretty sturdy.
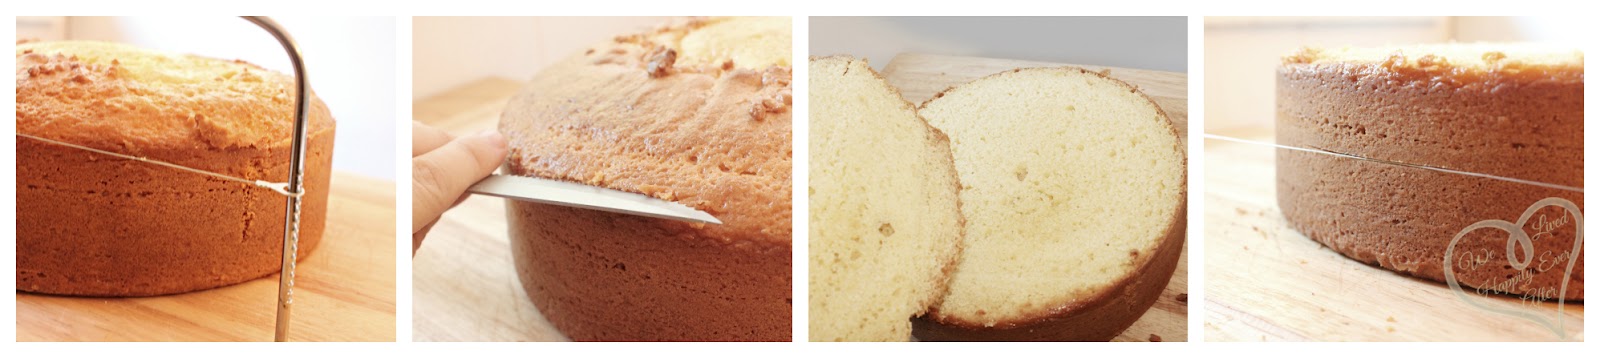
Cut your layers with your cake layer thing. Count both side’s groves to make sure the wire is level on both sides. To help the wire go through, I just lightly sliced the beginning part with a knife.
Use a sawing motion. Don’t go to fast. Go slow. You want the wire to be straight at all times, with the “feet” of the saw on the ground at all times. You don’t want to make the wire bend in a “U” shape from going too fast. Your layers will be uneven if you do that.
NOTE: The cake I demonstrated with was the deep dish 10″… so I used it for both of the cake’s layers after I cut off the top. The 6″ and 8″ pans were two shallow, so I baked two separate layers for each & then cut off their tops so I could have my two layers per cake.

Now for the best part. The frosting:
I made a dark chocolate frosting, because the Bride loves DARK chocolate:
2 sticks butter room temperature
1 2/3 cup cocoa
6 cups powdered sugar
2/3 cup milk
1 2/3 cup cocoa
6 cups powdered sugar
2/3 cup milk
Beat all ingredients in your mixer. About 2 cups frosting.

Now cover the tops of the cardboard cake bottoms with a light layer of frosting to act as an adhesive (but edible!!!) “glue” to the bottom of our cakes.

Now we need to make a “dam”…. or, in other words, a wall of thicker frosting around the cake edges… because we don’t want all the filling to “squish out” from our layers due to the weight of the stacked cakes. You just add more powdered sugar until you get an almost play dough texture.. Keep on adding more powdered sugar until you get it stiff enough so that when you touch it with your finger, none sticks.

Notice I used the bottom of my cake for the top part.
Note: if you are doing a fruit or some other filling, you need to coat both the top of the layer you are making the “dam” on, and the bottom of the layer that will be sitting on top of it. If you don’t, then the filling will soak into the cake & make it a soggy mess. 🙂
After you have made your dam, fill it in with a lake of your filling (in our case, more frosting!)! 🙂

Finish it all off by doing a crumb coat of frosting, using the back of your cake spatulas, and your cake lifter as a scraper. Be gentle. 🙂
Because I am doing these cakes in two separate days, five days apart, I put my cakes in the freezer.
I let them “flash freeze” by sticking them in the freezer for a few minutes each, so they would hold up when I wrapped them in plastic wrap.

Well, that’s part one. It probably took me around 3-4 hours to do all these steps.
Check back for Part 2 next week!


this is some really good information, thanks for posting this! I love your blog!
http://mommysordinarymagic.blogspot.com
Thanks! <3
The last wedding cake you did looks amazing. I'm sure this one will look just as great.
xoxo,
Melissa
Thanks. That one was a monster! (This one is a "piece of cake" (haha) compared to it. I sure hope it turns out beautifully! We will see this Saturday! 🙂
Looks yummy!
That's looks gorgeous..I like your blog..Thanks for sharing