


I am so excited to share my first real Home Improvement DIY project with you all. There is only so much you can do when you don’t actually own a home yet… which is why I invaded my parent’s home and ask them to channel my DIY passion into their guest bathroom! 🙂

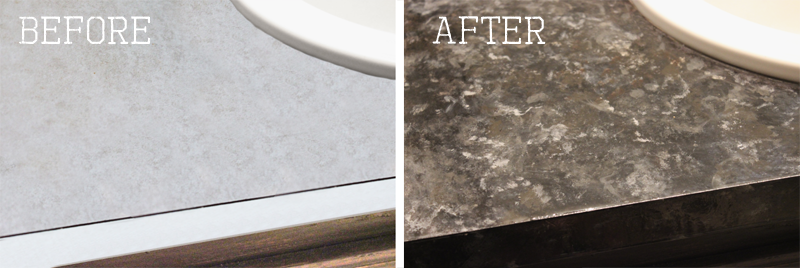
My parent’s guest bathroom was in need of some real love. With zero natural light & ugly builder grade everything, we had our work cut out for us… and believe it or not, on a budget of under $100 this is what it was transformed into. The projects included in this bathroom redo were the counter tops ($25), refacing the cabinets, framing the mirror, and painting & stenciling the walls (Tutorial for my free hand wall stencil found here)
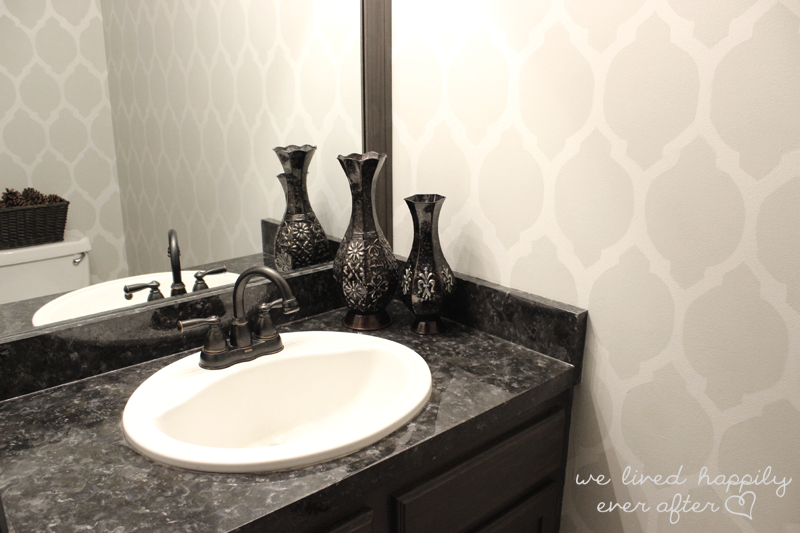
The end result is really amazing! The question is whether or not to brag about your “fake granite counter tops” or let everyone think you just had real granite installed! 😉
I admit up to the very end I was so scared that they wouldn’t turn out as perfectly as I wanted them to, but I could not be happier with the end result!

First things first, you will need the following:
–Sand Paper to rough up the counter-tops
–A Good Primer that will work with acrylic paints. We actually used a Rust-Olleum Spray Saint Primer.
-Some Granite Counter Samples (optional)
–Acrylic Paints of your color choice (you know, the little bottles of paint you buy at your craft store!)
–Paintbrushes and a Sea Sponge
–Painter’s Tape
–Drop Cloths/Cardboard as protection against the sealant
–Ultra Gloss Epoxy (the box will tell you how much of it you will need for the square footage you will be using it for)
–Gloves, something to mix the Epoxy in & something to apply it with (we used a painting stick.. haha!)

I grabbed a few granite counter samples from my local home improvement store to get an idea of what color, pattern and texture would fit the style I wanted to incorporate into the bathroom. We decided to go with a dark version, with lots of cool grays, some silver, some browns, and lots of black.

Give your counter tops a good wash down to make sure there is no grime. Sand it really well.

Wipe off any dust from sanding, and tape off any places that will touch your counter tops.

Since we used a spray paint primer, we protected the wall with cardboard. 🙂

Make sure to spray really well (no drips!) and make sure it has even coverage because that is what everything holds onto. Let dry completely.

The painting was the hardest part for me. I was really particular about how I wanted it to turn out. I didn’t want it to look like someone was really sloppy and just dabbed paint here and there with a plastic bag.
To get the look we wanted, we worked with the darker tones first, then added the light highlights after, subduing some of them by patting them down with some of the darker, slightly watered down paint. Study some of the granite samples you like to see how the natural “grain” of stone looks.

We just played with it until we liked (okay, LOVED!) what we saw. We found it’s best to work with it all wet so you can blend better.
We also alternated between sponges and paintbrushes for the finer details.
We liked the marble effect so we made sure to incorporate some “Squiggle Lines.”
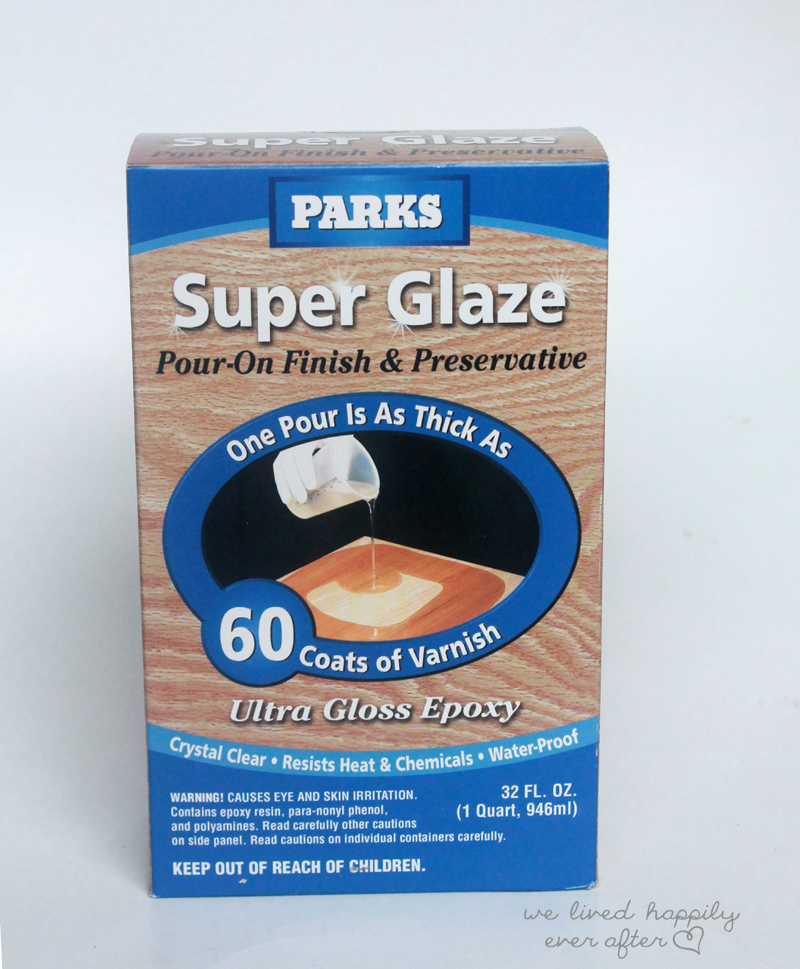
After you let all your acrylic paints dry, it is time for your Epoxy.
Follow the Directions EXACTLY as stated on box. If you and too much of one of the components, or don’t mix it perfectly then you may end up with a sealant that doesn’t dry in some spots. Ours didn’t have any issues, but it did have lots of bubbles from stirring (ahhh! More on that below!)
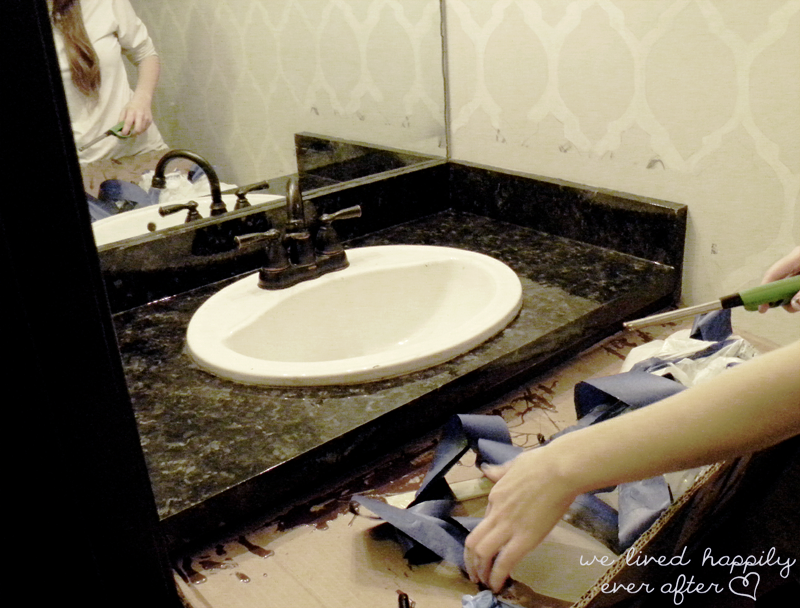
Here’s a (very real, unstaged) photo of us adding the Epoxy to the counters. We used a large piece of cardboard to act as our “drop cloth.”

Use gloves when applying this stuff. It’s super sticky! The box didn’t specify how to apply it other than pouring it on the surface. We didn’t want to risk getting paintbrush hairs, or stroke lines in our sealant, so we smoothed the “puddles” out with a paint stick to give even coverage on the whole counter tops.
Going up on the back splash was a little trickier… I can’t help but wonder if it would have worked a little better to use a paint roller… but you only have so much time with this stuff before it dries, so work quick!
I recommend starting with the back splash first, so that the excess sealant doesn’t run down onto your already finished flat surface.
If you get bubbles in your sealant from mixing or pouring, either blow on them or hover a lighter above them to pop them. We did both. 🙂
Now you have to patient and let them dry… for a long time! I think it’s a 24 hour set time, but I would recommend not putting anything on them for at least 48 hours.

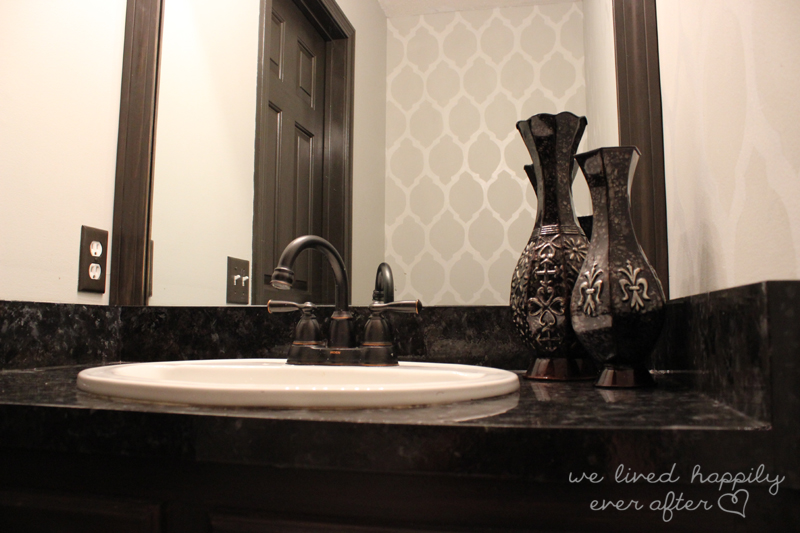
They are SO gorgeous. No pictures can do them justice!

They Epoxy gives a complete waterproof, shiny, gorgeous finish! It’s been a couple months since we did the counters and they are holding up beautifully!
The only question I had was, “Why didn’t we do this sooner?!”
Give it a try! It looks so great that my mom asked me to do the other two bathrooms in the house soon!
Breakdown of Costs:
The Extra Gloss Epoxy $17
(I got it from Home Depot. But I only needed half of it, which means I can use it for another bathroom!)
Spray Paint Primer: $5
Acrylic Paints $3
(because we had most of them on hand)
Paint Brushes & Painter’s Tape $0
(we already had some on hand)
PS) Thanks to So Lovely Creations & Wild Whitney for your inspiring tutorials on fake granite counter tops! If you want future information on how other people have used similar methods, check out their tutorials!


Wow, these look great! I am super impressed. The epoxy part scares me though!
The epoxy had me really scared too, but honestly, the result was so stunning that it really didn't end up being a big deal. Just make sure you follow the directions and you will be totally fine! 🙂
They LOOK beautiful!!! What I want to know is: how long did it take you?!? Great job, Hannah!!! Bet it looks BETTER than Granite–withe artsy details of being hand-done.
It took us a good hour or two to paint it, plus another hour for prep and applying the sealer… And then drying time.
We were really picky with how we wanted it to turn out, so I would say it's maybe a 3 hour work project… Plus drying.
<3 Hannah
Wow, that's way less than I expected. I'd say that's good time!!!
BEAUTEOUS.
Whoa, those counters are GORGEOUS! Skill.
I am not much of a do-it-yourself person, but this is the first tutorial I've seen that I'd seriously consider doing… when we get a bathroom with a counter top. 🙂
Bee-yoo-ti-ful!!
What an awesome project! Now I want to do this to every counter in the house haha. My first time reading you, I'll be back 🙂 Great ideas!
Thanks Jenni! 🙂
Looks beautiful but I can say first hand that we rent a house that has this same paint job on the kitchen counters and they suck really bad as far as durability goes! Every time I set a heavy bowl down on it, it flakes away and I am left with ugly brown laminate spots all over 🙁
Oh no! That's not good. Perhaps they didn't sand, prime or seal it properly?
Because of the wear and tear for kitchen countertops, I don't know if I /would/ recommend this method for kitchens. But for a bathroom sink that isn't exposed to pots and pans and what not, these countertops have stayed in really good condition.
Awesome job on the countertop! I found you through Pinterest. This is my first time reading your blog and I will be back. I have a blog myself but I am new to blogging so it needs some, ahem, a lot of help!
I am a Blue Star Mothers (ARMY – HOOAH!) so tell your husband thank you for his service!
Thanks Debbie! I will tell him! 🙂
About blogging: We all have to start somewhere! 🙂
Thanks for stopping by and leaving such a sweet comment.
Hey I was wondering what color paints did you use to get the black marble look? I love that countertop!
Thank you!
Krista
Thanks Krista! I don't have the actual names of the paints, but they were just the generic acrylic type you get at craft stores.
Lots of cool grays, little bits of metallic silver here and there, a medium brown and a darker brown, and lots of black. We really washed all the colors down with black. I am hoping to do the upstairs bathroom with this same color and look, so I will be more diligent and actually get the paint names!
But really, the colors we used were pretty basic color chart colors. The one thing I would say about them is that they were pretty muted. Like I said in the tutorial, grab a few samples of granite from you local hardware store and try to match the colors from the sample.
Hope that helps! I will try and match the colors for the next project & update this tutorial with that information! 🙂
<3 Hannah
I am currently doing this with one of my spare bathrooms! I'm having trouble getting the corners to come out as perfect as I want them to though. Even when using a small sea sponge it doesn't quite do the "dab" effect and it'll end up smearing around the corner. I tried using a small paint brush to make a similar effect but it looks too deliberate of blotches…. any tips??
Thank you! Yours looks so good! I'm praying I can have a finished look similar to yours.
Morgan
Try working in layers, making very distinct splotches of the different colors, let it kinda dry and then use the sponge to "lift" and blend the colors. You get better at it as you go.
I'm sure it will turn out great! Honestly, we were creaking out that it wouldn't turn out, but we kept at it and we couldn't love it better! 🙂
Hope that helps!
<3 Hannah
This is something I want to try in our bathrooms but we don't have laminate counters. Our counters are fake marble/granite. Does that make sense? could this process work on that?
How did you frame the mirror? It looks beautiful!
I measured the dimensions and had Home Depot cut them (easy), painted them, and then used liquid nails to adhere them to the mirror. 🙂
This is simply amazing!!!
I am going to try this on a counter that has the sink built into it…it's an ugly green corregon type of counter. I am worried about the epoxy ante the curved sink. Thoughts on that?
That's kinda tricky- it would probably drip off into the sink while drying, and you don't really want to have anything like tape there because you don't want it to dry that way. I would look up using a roller with epoxy and see if people have used that? Let me know how it turns out!
I've done this with an "inset" sink. Just be sure and tape off the entire sink really, really well because it will drip into the sink. I used Green Frog tape and it worked well. After it's dried, take a razor blade and make a cut along the upper edge of the sink along the tape line and THEN peel the tape off slowly from bottom of the sink near the drain, toward the top and try to peel horizontally. My finish did not chip, and several months later, after using the sink daily, the finish has held up. 🙂
Hi I saw this tutorial and wanted to see if you had any tips I could use. I've actually done this to several countertops and they do turn out beautifully! I used a different epoxy- Envirotex Lite – you can get it at Hobby Lobby- but yours is cheaper and I think I'll try it on my next project. My hint is this. I poured the epoxy on the countertop – your hint about starting with the backsplash is correct!!. But my hint is, after you pour, and start to see bubbles form, use a hair dryer to "push" the bubbles out and pop them. You have to play around with how close to hold the hair dryer, but it works! And no brush marks!
We just bought our first home and I HATE our bathroom counters (the previous owner even painted one with latex wall paint!?) We are on a tight budget and I can't wait to try this! Thanks for posting this tutorial!
How do you maintain it?
As long as it isn't in a high traffic "use" area (like the bathroom I did) then it doesn't need much upkeep- the most would be "patching" any areas the resin may not have gone over the first time. It works really well! But you always have to whipe water off of it, or it will stay there forever due to the waterproof nature of the resin. Hope that helps! 🙂
Beautiful!!… What color do used for the walls??..I love it!
So glad you like it! The color information can be found in this post: http://www.welivedhappilyeverafter.com/2013/07/diy-free-hand-wall-stencil.html?m=1
Love your step by step instructions and photos. you make it look so easy, can't wait to try it out. What products and color did you use to reface your cabinets and was it difficult?
I don't remember the exact paint color, but it was from Home Depot. We just sanded it really good and then and repainted it. Hope that helps. 🙂
Hermoso! Fantastic tutorial! I'm definitely pinning this for when I get a countertop to use it!
Hey there….I do poured resin countertops all the time and wanted to pass along the tip of using a foam brush to push the resin around after you pour it. A stir stick would work but a foam brush works much better! Just fyi! Love your blog.
Great tip! I just redid one of my counters and used a small foam roller too- much better! 🙂 XO
My biggest dream would be to have granite kitchen counter tops. Since that is super expensive and out of the question, I will settle for a look-a-like. If I can change to fake granite for less that $30, that would be pure brilliance. Sometimes, you have to make a change that isn't fully what you want, but better than what you had.
http://www.pioneerplasticsak.com
Hannah, I did a bathroom counter, but the counter is not smooth where I used a sponge to dab on different colors. Do you have any idea what I did wrong and what I can do to make it smooth? Your counter is beautiful.
Hannah, your counter top is beautiful. I tried to do a similar one, But the paint is rough where I used a sponge to dab paint on.. Any idea what I can do to fix it or what I did wrong? Thank you.
Omg your new countertop looks so nice! I plan on following your approach but 1 question though. Did you remove the old caulking around the sink on the countertop first before painting? Also, once you sealed it with the epoxy, did you re-caulk the sink?
Thanks!
Jeff
Hi Jeff,
I've done this to three counters at this point, and with two of them, I just left the chalking as is. But with the third, since we are installing it, we are chalking afterwards. Either way should work though. 🙂
Hope that helps!
Can you think of anything that would make them durable enough for a kitchen? I want to do this to mine so bad we can't afford new ones and I LOVE the look here!
I would like to know if this would be durable enough for the kitchen counters as well. Mine are yellowish harvest gold color and I want to redo those as well as paint my cabinets white. This exact color countertops would look great with white kitchen cabinets.
Yes, this will work for kitchen countertops as well! Just make sure you use chopping boards and trivets to avoid possible damage to the counters and you'll be fine. (You should be doing that anyway, right??) I just did my kitchen contertops yesterday. I started with the Giani Chocolate-Brown Kit, but I added a few of my own water-based acrylic paints to the mix (watered down). They look fab!!!
Great job!!! My husband and I just did our kitchen countertops yesterday; I applied my colors the same way you did – I found that putting them on one right after the other and not letting them dry, then dabbing with a slightly wet sponge – was the BEST way to blend the colors. I've seen some samples where you can definitely tell the paint was obviously sponged. Yours looks gorgeous! Thumbs up on the great job! They're stunning.
This looks absolutely amazing!! I'm moving into a new house and I wanted to get rid of all the white in the bathroom and give it a more modern and chic look, this is just fabulous and I definitely plan on doing this. Would you mind explaining how you did the sink, did you paint a dark base first and then used the sponge for the highlight? I also loved what you did with the walls and the color scheme, I don't think I'm coordinated enough to make mine as perfect…do you think it would look bad if I did horizontal strips instead? I hope you get a chance to see this, thanks for sharing your creativity :)!
-Carmelita B.
Hey! Just like in the photos, I used a dark base for the counter tops, and laid other colors on top of that. Stripes sound great too! XO
THIS LOOKS AMAZING IM CONSIDERING DOING MY KITCHEN COUNTERS NUT THERES SO MUCH MORE COUNTER THEN YOUR PROJECT AND IM SCARED ILL WANT TO GIVE UP IN THE MIDDLE LOL BUT YOUR PROJECT CAME OUT PERFECT!!
THIS WAS AN AMAZING TRANSFORMATION!! YOU DID AN PROFESSIONAL JOB, I WANT TO DO MY KITCHEN COUNTERS BUT I HAVE 3 LARGE COUNTERS… IM SCARED ILL GIVE UP IN THE MIDDLE BUT YOU DID GREAT!!
Do I have to use acrylic paints for my colors or will other types work as well?
Beautiful job by the way!!
Aloha
Liz