


After the room reveal for my $55 Little Girl Playroom, I had several people ask me how I made the following image:

So today I am going to show you the simple photoshop trick you can use to make yourself look like a professional designer with access to really cool software.

To make a color portfolio, take whatever image(s) are inspiring your color pallet and open them up in photoshop.

Here you want to pick the colors you want to pop in your design. Hold down your mouse when clicking around to see each individual color. It will help you select the exact color you want.

Here you will be creating the shape your colors will fill. I suggest doing this on a new, blank layer.

Things are starting to get colorful! Fill the whole block with your first color.

Above we are creating the boxes for our next colors. I just painted white (my overall image background color) over the coral orange color to separate my boxes.

If you want to attach the colors to your inspiration photo (which this tutorial assumes) then make sure they are aligned and spaced correctly in retrospect to each other.
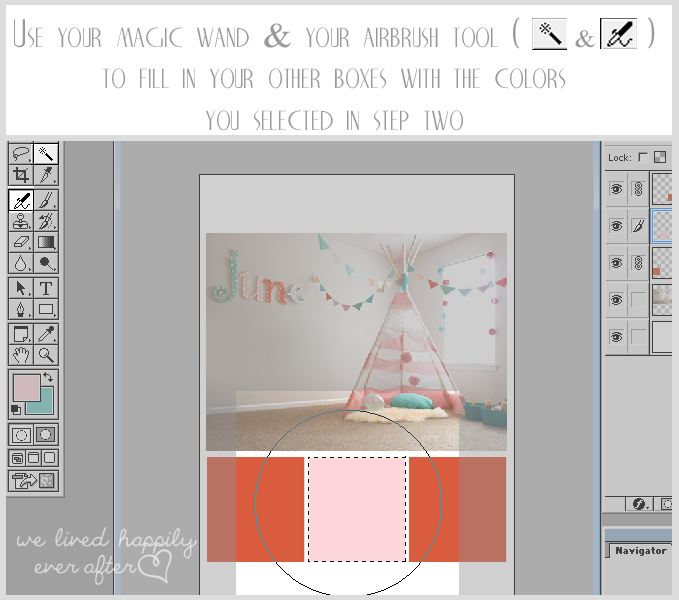
As mentioned, use the same step in picture number two to select your colors to fill your other color boxes.

Lastly, add any text, watermarks, or notes to your collage. I added an arrow shape, and some text using my text tool.

Now check out your finished image!
Pretty awesome, right? It’s such an easy Photoshop Trick. Honestly, you could use any photo you wanted to. Here are additional examples I made to show you what you can do with these Paint Chip Style Collages.

You don’t need to keep your inspiration photo in the collage either. I didn’t in my playroom post because I was trying to show the colors that inspired the room before it was created. But I think it’s really cool to see the photo included in the color portfolio… it kinda makes it all tie together!

In a few days I’ll show you how you can get the same effect in Picmonkey (for those of you that don’t know what Picmonkey is, it’s a free photo editing software online)
I’ve done my best to make this tutorial as straight forward as possible, but if you have any questions, let me know by leaving a comment below!


awesome! thanks for the tutorial!
My pleasure! 🙂
Thank you for this great tutorial. Bookmarked it for later!
So glad you like it!!!! 🙂
Great tutorial! Thanks for sharing!!
No problem! <3
May I know what font did you use for the word "Design portfolio"? Thank you! 🙂
That would be "the only exception" which is one of my favorites! 🙂