


I just love Picmonkey. I mean, it’s not Photoshop, but you can still get creative with it and do very similar things… and the best part is it’s free (minus the optional pro package)
In this tutorial I want to show you how you can use all the free parts of Picmonkey to create a custom image watermark for all your photos. It’s quick, professional, and so much easier than manually typing your slogan on every single photo you want to watermark.
First off, you will need to download the image I provide in my download folder (click the link below)

This image is called a PNG image. It allows you to work with a transparent background.
Save it somewhere you will easily remember.


Remember how I said your image will be transparent. Yep. Don’t freak out. It’s still there. 🙂
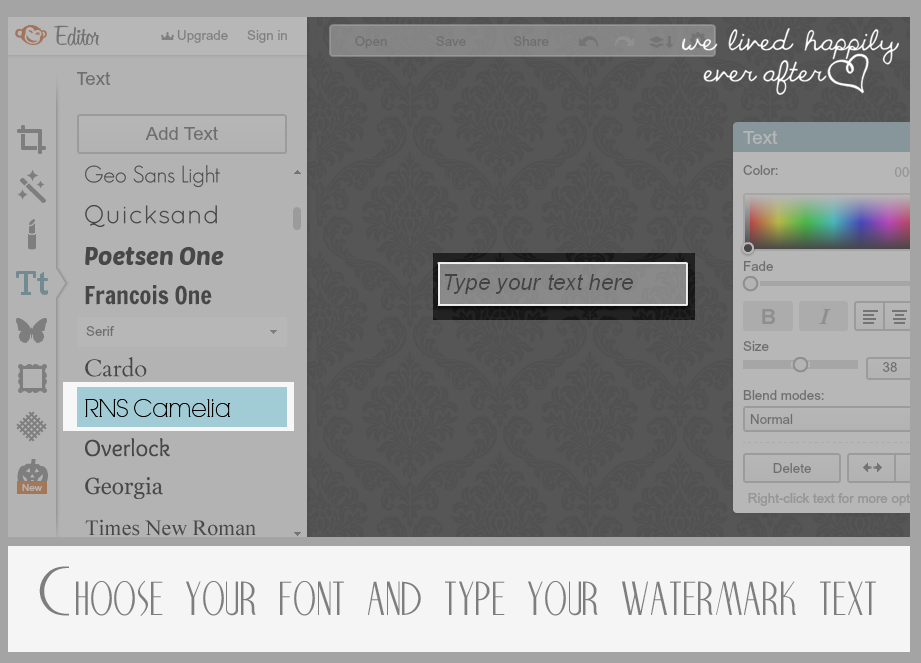
Write your blog name (example: We Lived Happily Ever After) or whatever you want to put there.

Personally, I am a fan of including your favicon (the little icon that show up next to your blog URL) in your watermark because it adds to your branding. You can tilt it too. Just turn the ball at the top and it will rotate the image.

You’re almost done!

Save it as a PNG file so it will keep the transparent background.


Looking good! 😉


Pretty easy, huh? Best part is that you didn’t need any fancy, expensive photoshop program to create a super nice watermark!
If you do have photoshop, check out my tutorial for making a watermark HERE.
I’ve changed my watermark three times. Yeah, my first one (see it HERE) was really bad- I wanted to it to (obnoxiously) cover most of my photo. Then I changed to an awkward heart with my blog name inside (see it HERE)… better, but it still was too bulky… and now I have created/found the perfect watermark for me. It has my logo and my name in it, but it is still subtle enough to not be an eye sore. So if you want to learn from my mistakes, don’t go with too elaborate and avoid something too bulk.
So what are you waiting for? Have fun!


Oh my goodness!! Thank you for the awesome instructions. I was adding a watermark each time. haha. This is perfect. Thanks for sharing! : )
So glad it helped! It's certainly an awesome time saver! 🙂
Thank you for the tutorial. I actually found a another free photo editing program when searching for one. I never used Picnk but says it's kind of like it…Ribbet. I tried to do a collage in PicMonkey but couldn't get it like I wanted it….Ribbet makes it sooo easy!!! I'm going to try to see if I can do your tutorial in Ribbit.
~Donna
Hannah, thank you so much for this post!. I was able to create my watermark quickly. I even mentioned you in my blog post about it .
Thanks again!
this is awesome! thanks so much! I've been wanting to do this, but could figure out the transparent background part. thanks for the download!
No problem! 🙂
I'm going to try this! looks pretty easy-
Thank you so much for such a great post! I haven't been watermarking any of my photos thus far because, well, I honestly had no idea how to do it lol But, now I have a super cute one…thanks!
So glad it was helpful! <3
That's great! Now I can mark my pictures easily. Thank you so much and many greetings from Austria!
Love this tutorial, but how can you edit the color in PicMonkey once the png file is saved? Am a little lost on how to proceed with creating the same file in different colors, and will appreciate any help you can give, thanks.
To make the file able to change colors as a png overlay, you need to save the png as completely black, or you won't be able to change the color in the future. Hope that helps! 🙂
2 years later and this still works perfectly! Thanks!
I am so happy I found this! I have been trying so hard to make a watermark in picmonkey and finally just settled on something! Now I don't have to settle! Yayyyyyy Thank you so much!!
This was so helpful! I've just started my own blog, called therusticboxwood.com, and I needed a tutorial on how to watermark. Thanks so much! Oh, and I love your blog!
Katie
Thank you!!
Thank you so much for this! I just started my very own blog and have ZERO graphics experience – this was a very quick and simple tutorial and it got me exactly what I needed to protect my pictures! Thank you so much!
So glad it was helpful! 🙂
Just wanted to pop in and say thank you for the great instructions. I have a new watermark! I love your idea about the brand labeling, you'll be seeing my little starfish on my header soon! I am a new follower now!
Thank you so much for sharing this! It saved me time figuring out how to do it. I am loving my new watermarks.
Hannah, this was such a helpful tutorial! Thanks for sharing. I love the way my new watermarks look!